Transforming Artwork to Etch into a Pint Glass Using Inkscape

Backstory

A while back my wife’s Jeep was in the shop, and besides just getting a newly-repaired vehicle we also acquired a set of Jeep-themed pint glasses to replace the last of a set of scratched up glasses we’d had for years. This led to a conversation in which Beth asserted that her vehicle was clearly cooler than mine because hers had a set of glassware for it and nobody would make that for a minivan. Honda, sure, but not a minivan.

That claim couldn’t be allowed to stand. Now instead of browsing Amazon or Etsy to prove her wrong I took the extreme route: I went shopping for a blank pint glass and a bottle glass-etching acid to make my own. I’m sure that says more about me than about how awesome my minivan is, but so be it.

Glass acquired, I did a quick image search and came up with a Honda logo and an outline of an Odyssey that I pulled into Inkscape and ran through the “Trace Bitmap” tool to create passable vector art. Almost ready to send it to the vinyl cutter to create stencils, right? Nope, the pint glass has angled sides so any art on it needs to be transformed to match the curve.

I’m sure there are specialized tools that can handle this type transformation automatically, but given that I already have a vector graphics tool that I’m comfortable with I’d rather dig deeper into the features in Inkscape than pick up something new.

Generating the Template

The pint glass I picked up takes the form of a truncated cone. I knew I needed to bend the artwork so it wouldn’t appear stretched/curved on the glass, but how do you calculate that?

Short answer: plug the glass measurements into a tool such as templatemaker.nl to get a template that will wrap the sides of it. As a bonus, that site also includes a breakdown of the math used to calculate the result in case you want to do it yourself. Is that directly useful here? Partly: it gives you the radius of the top and bottom of the glass, which lets you calculate the bend radius at the height of the center of your logo. You have to do a little more work to make that data easy to use.

I’m lazy, so I fired up OpenSCAD to generate my own template that I could just snap my image to for easy bending. Did it work? Yes. Is it really the best tool for generating SVGs? Not really, so I made a better one:

Simply enter the dimensions of your glass, desired logo size and buffer width, and how high you want the logo to be on the glass and it will generate a template with all the points you need to transform your art and a guide edge to align with the top of the glass to ensure it’s positioned correctly. Instructions are under the embedded form so I’m not duplicating them here.

Etching Glass

Once the image is transformed and the template is cleaned up you’re ready to send it to the vinyl cutter to make a stencil. After cutting simply weed the parts you want to show in the final product, then transfer it onto the glass using the top edge to line up the height and being careful to keep it vertical. I had some trouble keeping it straight, so if I try this again I’ll probably use a dry erase marker to draw a vertical reference line to line up the vinyl edge against.

Make sure the vinyl has a good seal to the glass along all the edges of the image. Bubbles under the vinyl don’t matter so long as you’ve got firm edges because the acid won’t go through the vinyl but can squeeze under it if it’s not stuck down well.

Follow the instructions for applying the etching cream, especially the safety instructions. Mine said to brush on, then rinse off and clean with soap and water after 15 minutes. Leave the vinyl on and let it dry to see how it turned out.

I wasn’t entirely happy with the results (faint, with some unevenness to the etching), so I did some reading online and tried again. I first stirred the acid cream to ensure even consistency and rubbed it in all different directions for the first 5 minutes before letting it sit for another 45 minutes. It’s not perfectly even, but it came out very clear.

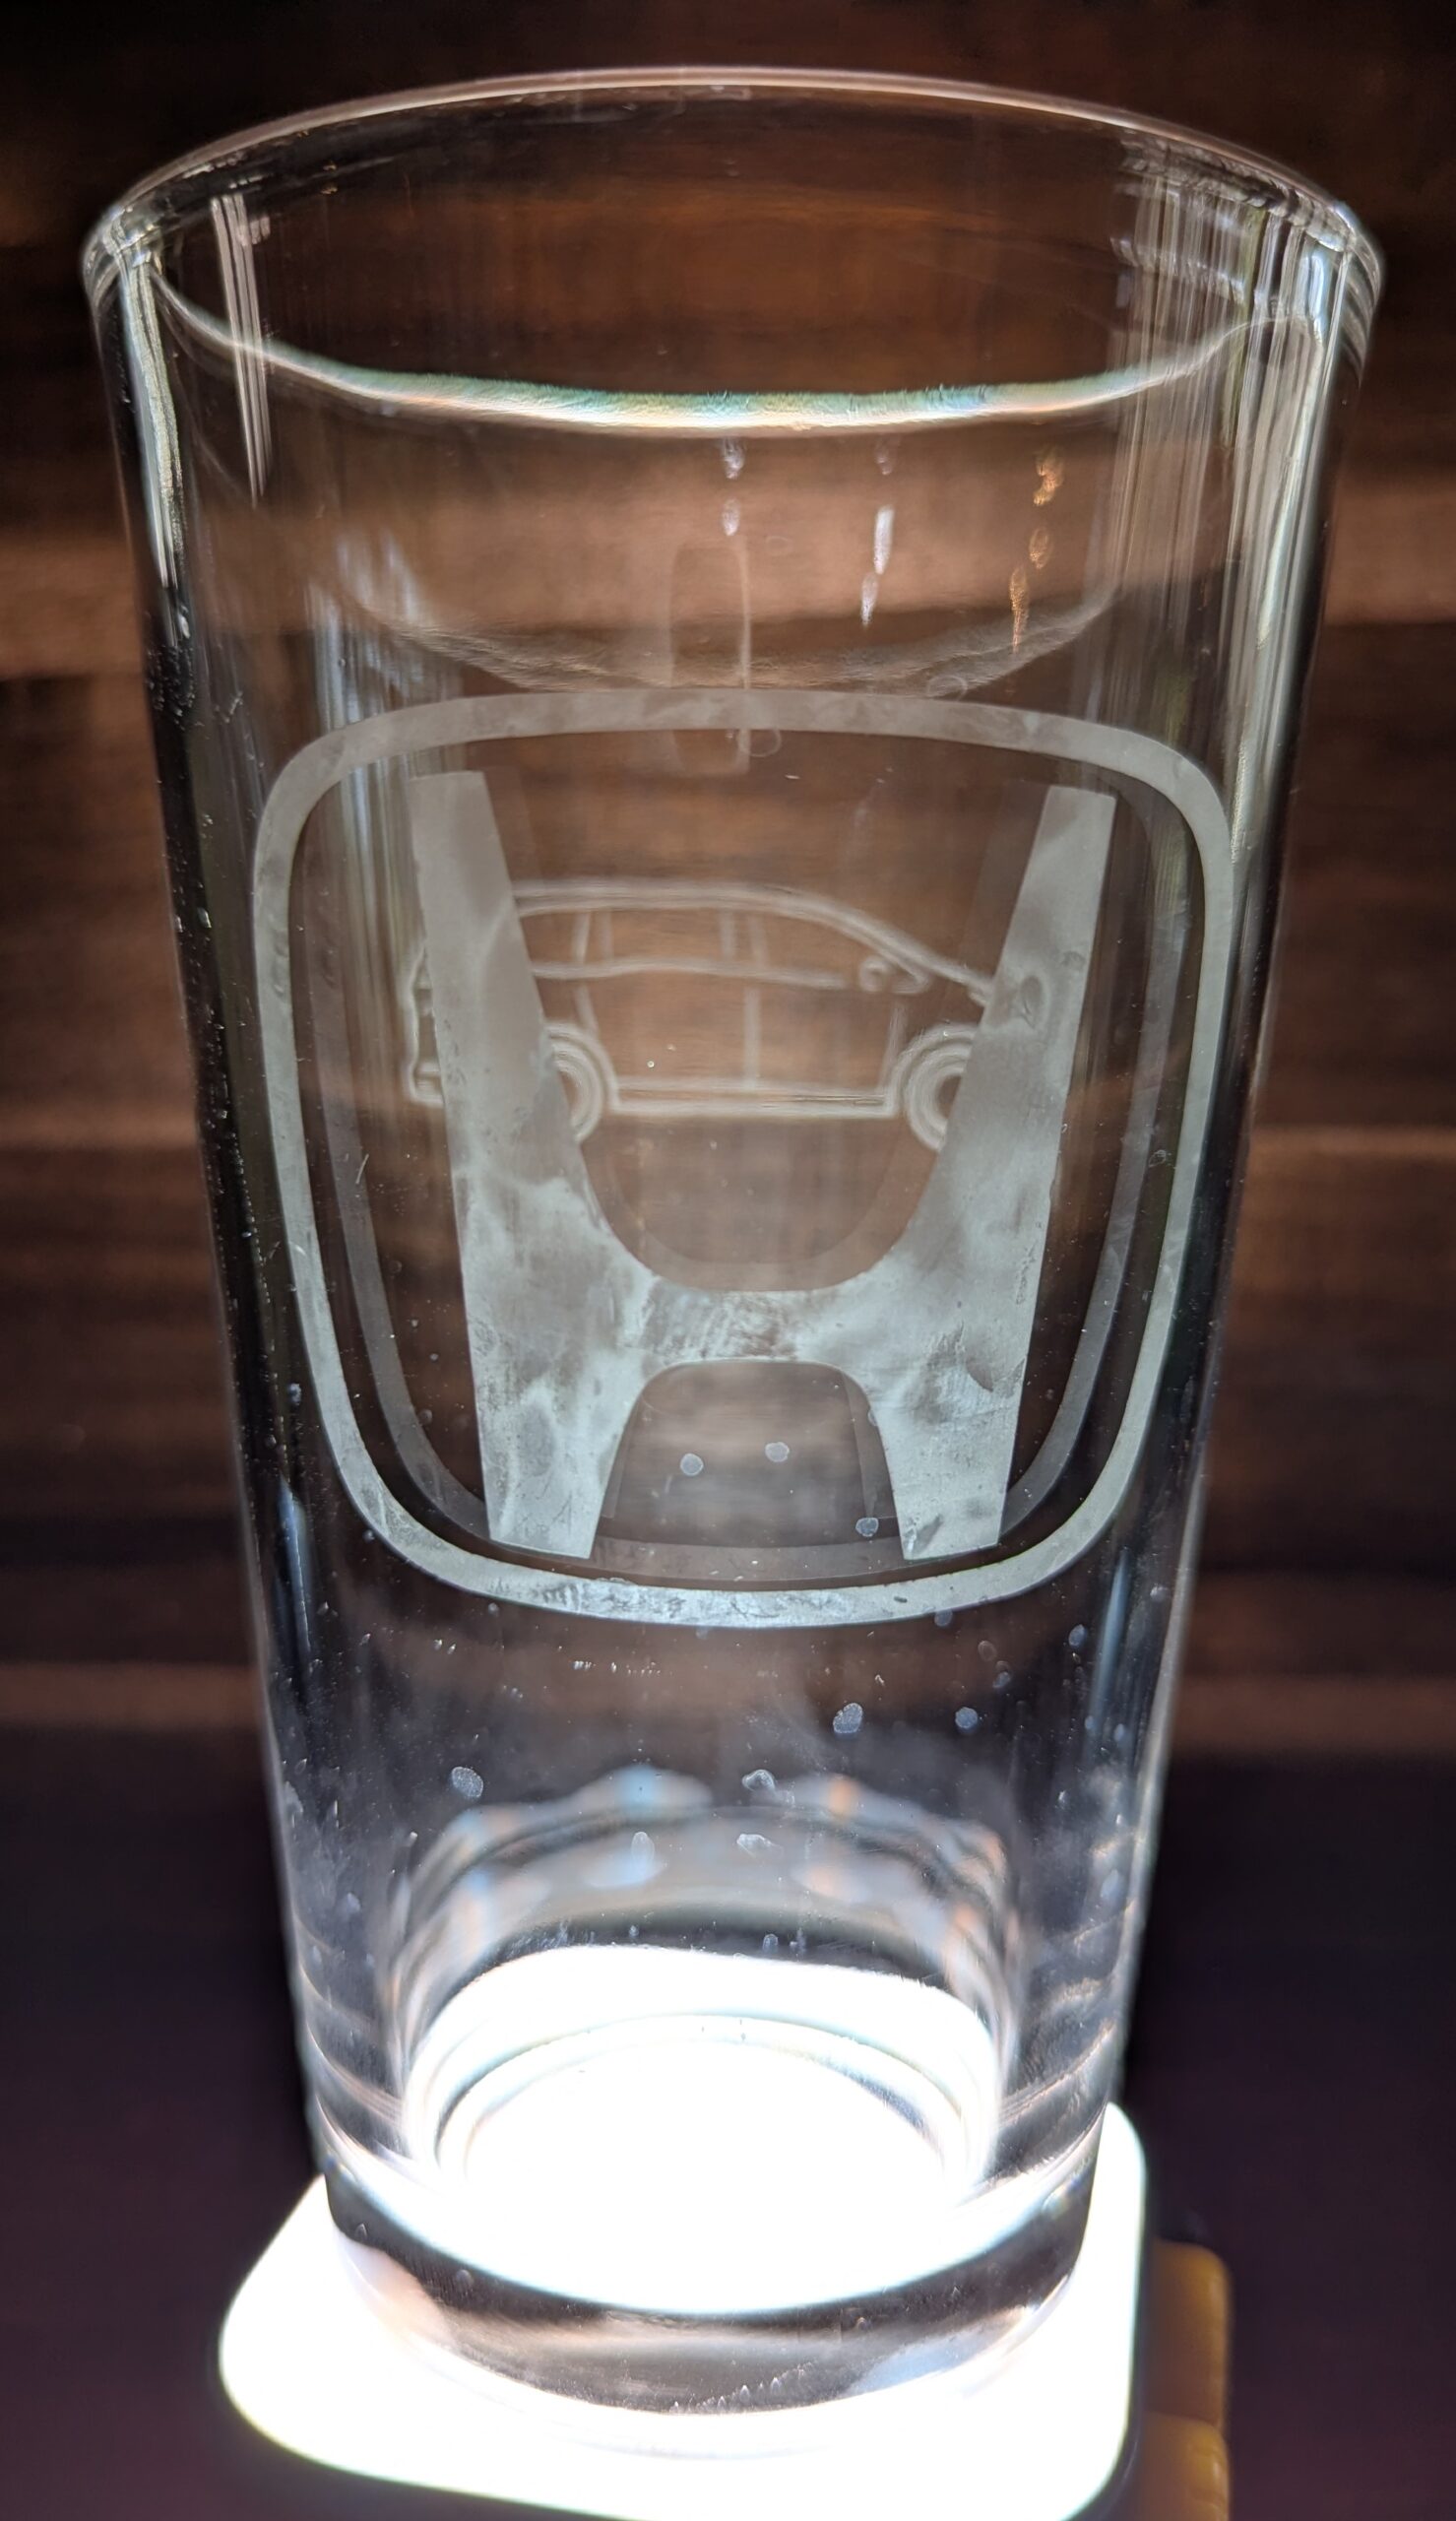
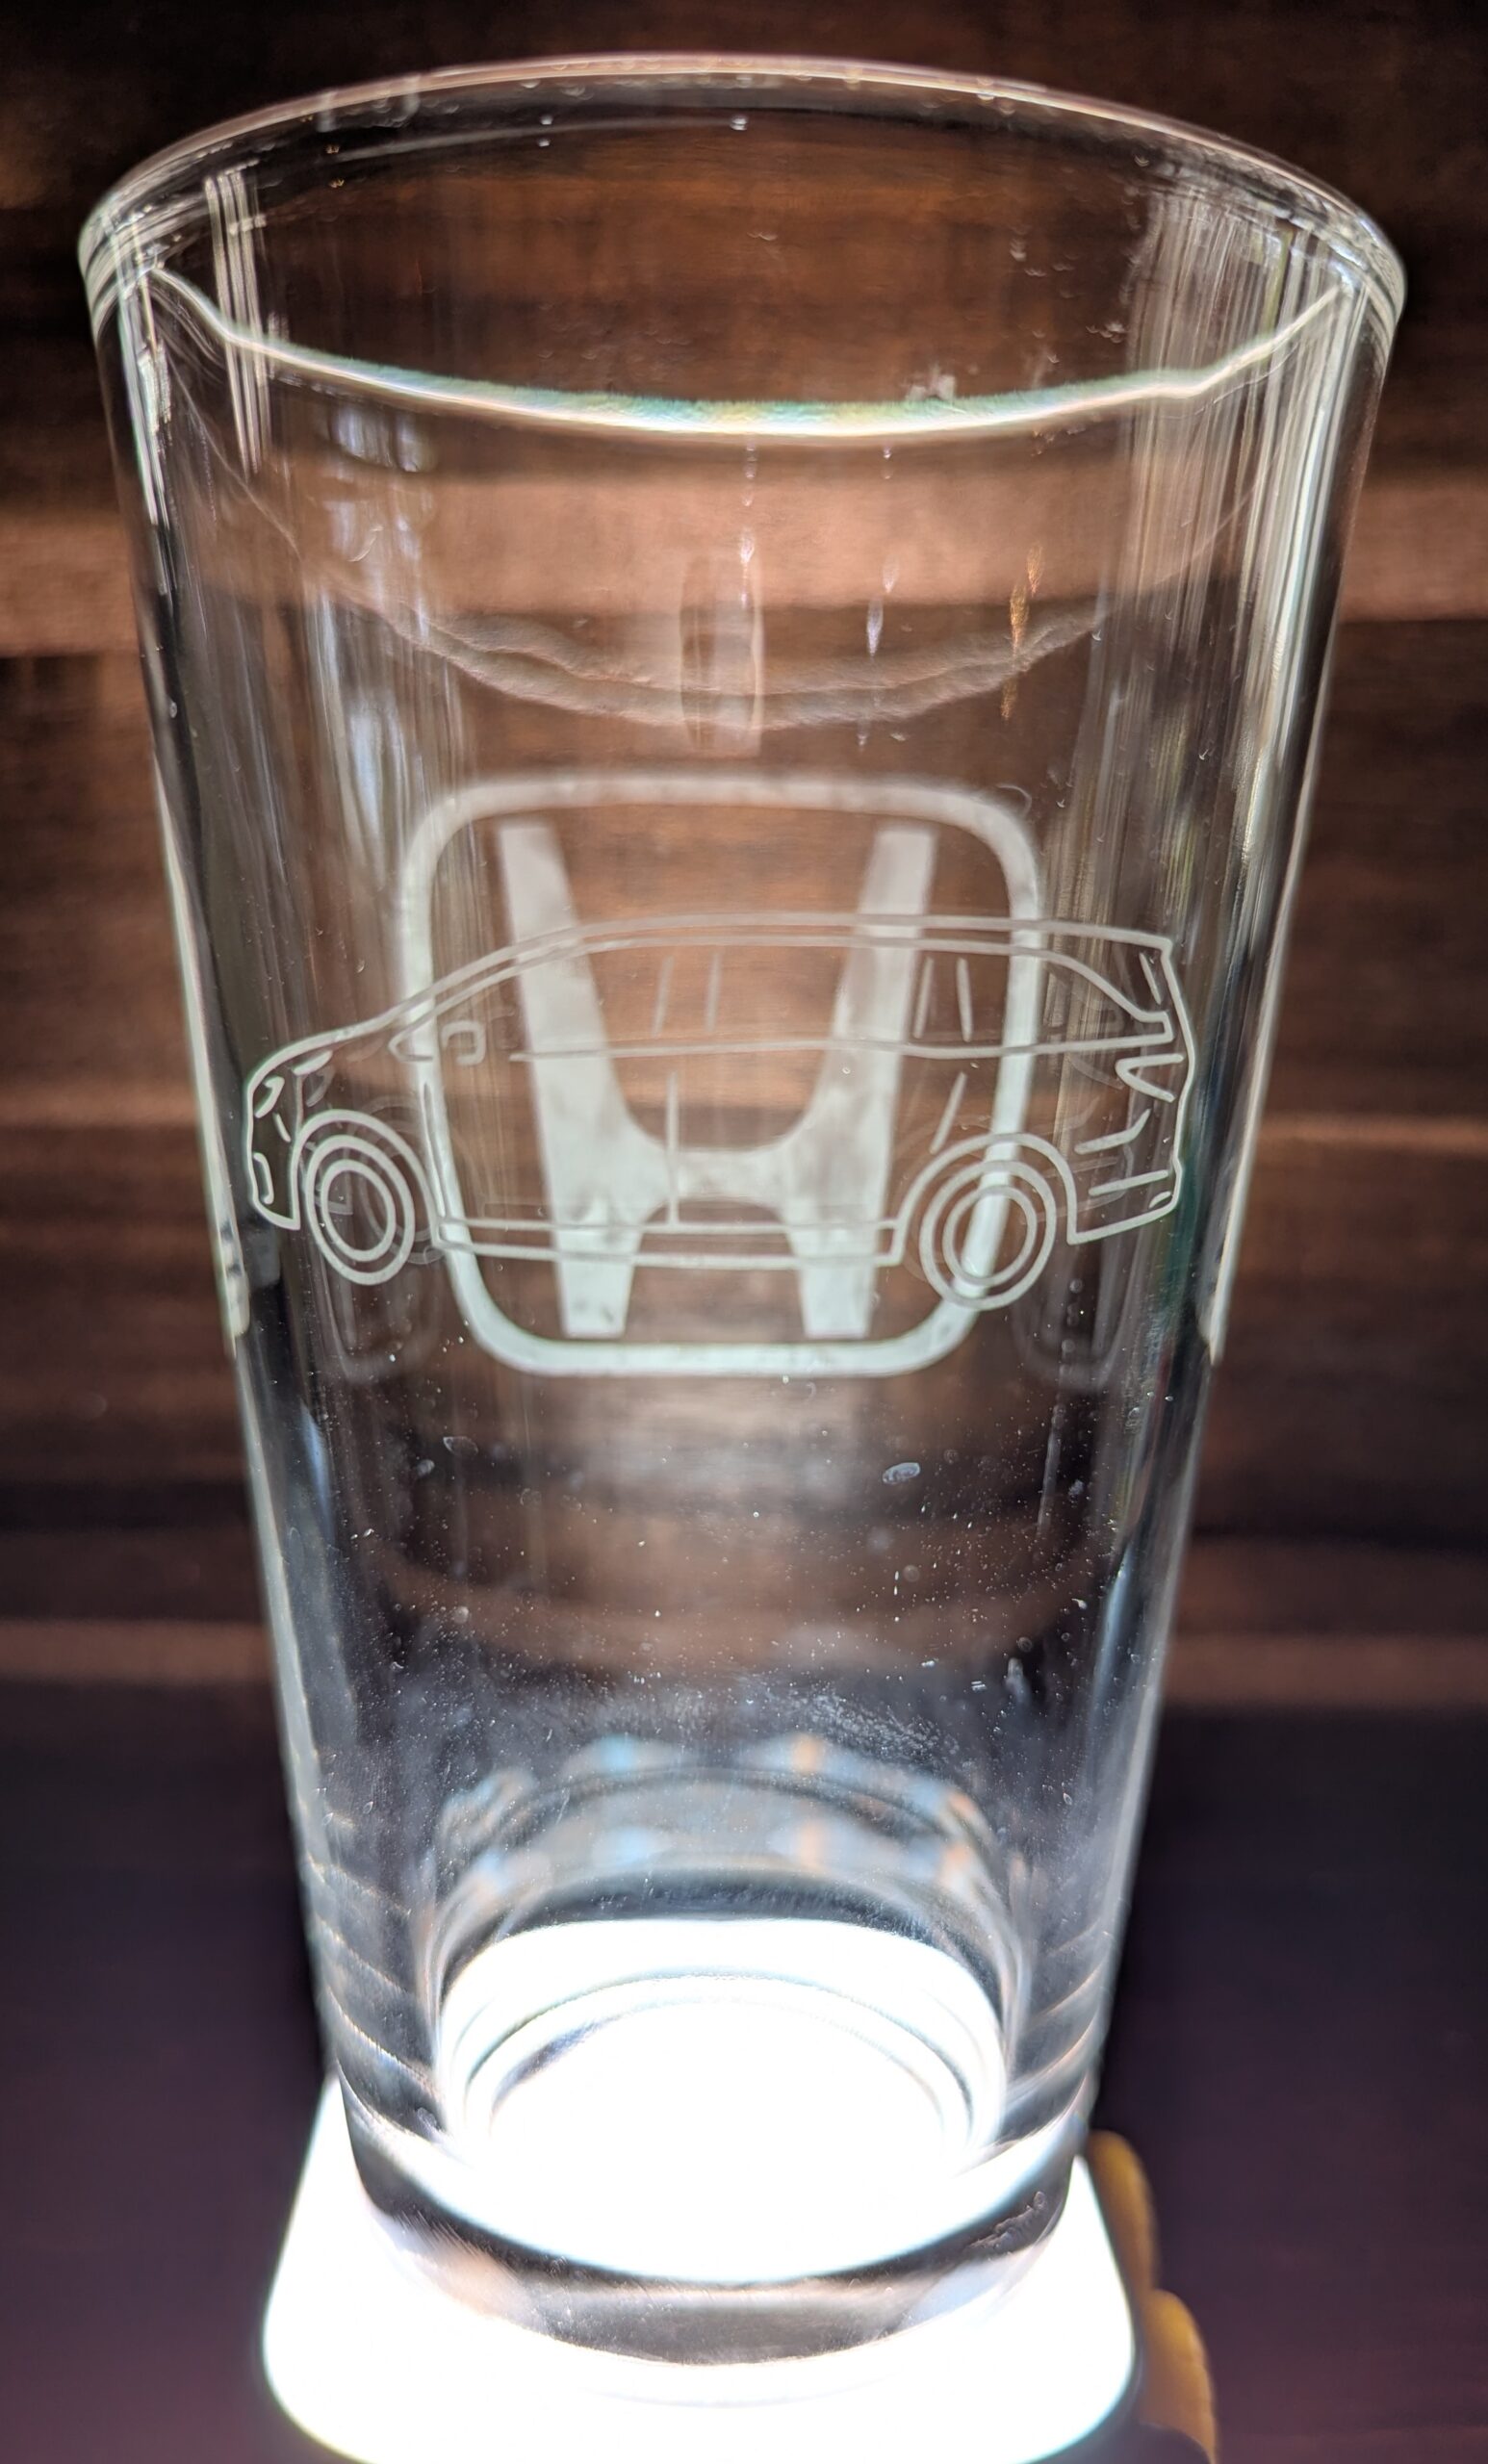
Pardon my water spots and finger smudges: this is the first time I’ve tried to photograph glass and I didn’t put enough thought into preparing it.

Backstory, Continued

I managed to get it filled and on the table at dinnertime without drawing attention to it. We were a decent way through dinner when Beth was talking to me (as I took a slow drink from my glass) and she suddenly paused.

“What? Where did you get that? Did you buy it?”

When I stopped laughing (giggling?) I filled her in on how I’d spent my previous two evenings after she went to bed. All was worth it for the look on her face when she noticed what I had, and for an added bonus I’ve got a glass that won’t get mistaken for anyone else’s when we have company over (because seriously, who would choose the minivan glass?).

Authenticating Nextcloud with Keycloak using OpenID Connect

A few months ago I started over on my home server with a fresh install of CentOS 7.6 (now updated to 7.7). I haven’t had a ton of time to work on it all at once, so I’ve been adding services one by one as I need them enough to make time for setup.

To get away from having a different login for every different thing I installed Keycloak was one of the first things I set up. Keycloak is an open source identity and access management tool that provides single-sign on with OpenID Connect and SAML. OpenID Connect was easy enough to set up with Jenkins and Gitea (using the appropriate plugins), but when I set up NextCloud I couldn’t find a tutorial (or any documentation really) for the plugin that offered OpenID Connect as an authentication mechanism. This post will document my path to getting a working OpenID Connect login added to my NextCloud instance.

Software Versions

Because I’m only working against a single configuration and don’t know how generally it will apply across other versions, here’s the list of the software I’m using for this post.

Getting Started

I’ll assume from here that all the above pieces are installed and configured for general use, just not hooked up together. From memory: Keycloak needs a realm set up with at least one user that will be set up for Nextcloud and Nextcloud needs the Social Login app installed and enabled on the Apps page.

Keycloak

Go to the Realm Settings page and open the “OpenID Endpoint Configuration” link in a new tab to bring up the .well-known/openid-configuration page. You’ll want the information from this page later to configure the Social Login plugin in Nextcloud.

Open the Clients page and click the create button. Select:

Client IDnextcloud
Client Protocolopenid-connect
Root URLhttps://<URL here>/nextcloud/

Click Save. On the next page (Settings) set:

Access Typeconfidential

Click Save, then click on the Roles tab. Add a new role named “admin”. Click Save, then go to the Mappers tab and add a protocol mapper as follows:

Namerole
Mapper TypeUser Client Role
Client IDnextcloud
Token Claim Namenextcloud-roles
Claim JSON TypeString

Click save, then add the admin role to a Keycloak user as appropriate so admin access is available through the Keycloak authentication. You can verify the mapping and user by going back to clients > nextcloud > Client Scopes > Evaluate, selecting the user, then viewing the Generated Access Token.

Go to the Credentials tab to find the client secret that will be needed in Nextcloud.

Nextcloud

As a Nextcloud administrator user, go to the Settings > Administration > Social login page.

My preferred settings for the first section with reasoning:

  • Disable auto create new users: unchecked to allow users to be created from Keycloak without needing a separate user created in Nextcloud
  • Allow users to connect social logins with their account: unchecked because no users were created on Nextcloud directly.
  • Prevent creating an account if the email address exists in another account: checked
  • Update user profile every login: checked so user changes on Keycloak propagate on next use
  • Do not prune not available user groups on login: unchecked to propagate Keycloak changes on next use
  • Automatically create groups if they do not exists: unchecked to keep Social login from adding groups with the “keycloak-” prefix. I would have this checked if group names didn’t have a prefix added.
  • Restrict login for users without mapped groups: unchecked because all of my Keycloak users currently have access to Nextcloud, even if they don’t have a specific group assigned.
  • Disable notify admins about new users: unchecked

Be sure to click Save: nothing will warn you if you leave the page without saving.

Add a “Custom OpenID Connect” entry (many of these entries will refer to entries in the .well-known/openid-configuration page you opened earlier in Keycloak):

Internal Namekeycloak
Title Keycloak (OIDC)
Authorize url<.well-known entry: authorization_endpoint>
Token url<.well-known entry: token_endpoint>
User info URL <.well-known entry: userinfo_endpoint>
Logout URL <.well-known entry: end_session_endpoint>
Client Idnextcloud
Client Secret<Secret from the Credentials tab in Keycloak>
Scopeopenid
Groups claimnextcloud-roles

If you want to redirect to a specific page (instead of having it load a blank page when it goes to the logout URL) add: ?redirect_uri=<encodedRedirectUri> to the end, where <encodedRedirectUri> is a URI-encoded path to the page to load after logout.

Any roles listed in “nextcloud-roles” will be prefixed by “keycloak-” when they are converted into group names. I suspect, but haven’t confirmed, that it’s from the internal name of the connector. I had to add mappings from each of my roles to the group intended, though in the mapping there isn’t a prefix added, so “admin” -> “admin” correctly assigned users to the admin group. This is why I disabled “Automatically create groups if they do not exist” in the Social login settings.

Again, scroll all the way to the bottom of the page and click Save. Be sure the popup by the banner tells you that the page has saved.

Now go to your Personal > Social login settings page and from the Social login connect > Available providers section click on the Keycloak (OIDC) button. This will either bring you to your keycloak login page or, if you’re already logged in, simply add an entry for keycloak to your user.

Debugging

The easiest way I found to test was to have one tab logged in to the Keycloak administrator pages, one tab logged into my Nextcloud admin account, and a private window that I could log in and out of as needed as I tweaked controls for both parts.

Here a couple of the problems I ran into and why they were showing up:

ProblemResolution
No login button next to
SSO & SAML logins
Social login buttons are added to the
Direct log in page
Error: No id_token was found. Scope was set incorrectly, resulting in the
wrong data being read by Nextcloud.

Conclusion

At this point I have everything functioning so I can either connect social login to my current accounts or create accounts on Keycloak and have them be created in Nextcloud when used to log in, as well as assigning the admin group based on user role from Keycloak.

I may soon configure the login page to automatically redirect to the Keycloak OIDC connector (set ‘social_login_auto_redirect’ => true setting in config.php), but for now I’ll accept an extra click or two to log in, at least until I’ve used it for long enough for all of my sessions to time out and be logged back in.

Rothenburg ob der Tauber

For Labor Day we took a trip over to Rothenburg ob der Tauber, a town in the Bavarian region of Germany that still has a medieval walled city at its center.

The gate defenses are still intact, with multiple layers of walls to pass through and large gates to close across the way. Here’s the west gate from the outside and one of the southern gates from the inside:

The city was considered to be the ideal German “Home Town” by the Nazis. It was damaged by bombing during World War II, but donations from all over the world helped to rebuild it after the war. On the inside of the walkway around the top of the wall are stones with names and locations of donors. Below are the steps up to the walkway at a gate on the northern side of the city (Klingentor) and the view of a couple of the towers on the east side (Galentor and Röderturm) from inside the walkway. Röderturm is on the inside of a gate that has a bridge over a dry moat, but we didn’t get a picture of that on this trip.

In the center of town is St.Jakobskirche, or St. James’s Church is in the middle of Rothenburg. We didn’t go in on this trip, but we got a good view of it from the wall walk at the end of our visit.

Many of the buildings we saw were of the traditional “Half-Timbered” construction, where large pieces of timber were joined together to make the frame, then the gaps were filled in with a non-structural material, leaving the timber frame exposed on the outside of the building.

There were a number of fountains in Rothenburg. This one is the herrnbrunnen, which has a crowned mermaid with two fish tails on top. The inscription on it marks it as being from 1595, and it’s where bakers who were found to be fraudulent were dunked as a punishment.

All over Germany we’ve seen window boxes full of flowers outside houses, or when the weather isn’t as nice rows of potted flowers just inside windows. We don’t usually stop to take pictures of them, but this one caught my eye as being an interesting pattern.